01 / AXIS 2.0
AXIS 2.0 overview
AXIS 2.0 turns a supported Android device into a robot-control pendant for RoboDK simulation and supported development workflows. The pendant connects to the Windows companion on your local network; RoboDK supplies the simulation station, robot and programs.
This guide describes the regular AXIS 2.0.0 release, not kiosk or development builds. Physical robot operation is outside this guide. RoboDK is separate software and may require its own license.
02 / AXIS 2.0
Getting started
Install AXIS 2.0
Use the official Google Play destination shown on the AXIS product page when available. If the page says the listing is not yet available, contact support about release availability. Do not substitute a kiosk, beta or test APK.
Activate on first launch
Enter your name and email in the activation form and submit it while online. Marketing consent is optional. Follow any displayed error; after success, choose Continue to AXIS. The welcome/setup email provides Bridge guidance. Activation success does not mean a local Bridge connection exists.
Download the Windows companion
Use the Series Bridge download card or download the existing Bridge ZIP. On Windows 10/11 x64, extract the entire ZIP into a writable folder and keep its README and files together. Do not run inside the ZIP.
Prepare RoboDK
Open RoboDK on the same PC. Load the intended station with a supported robot. Confirm simulation and disconnected physical drivers.
Start Series Bridge
Open
AXIS2SeriesBridge.exe. Wait for responding services, Network ONLINE and the correct RoboDK station. Note the displayed PC address and keep the window running. No Python installation or development terminal is needed.Check the network
Use the same trusted local network for phone and PC. A wired PC and Wi-Fi phone work if they can reach each other. The Windows network must be trusted Private LAN. Guest networks and client isolation can block discovery and direct connections.
Connect from AXIS
Tap LINK or BRIDGE. Select the discovered Bridge or enter its displayed PC address, optionally followed by
:8765. Choose CONNECT; RESCAN refreshes discovery. Use your own PC address, not the address in a screenshot.Select and verify
Use the top robot selector. Confirm CONNECTED, Bridge Online, the intended station and robot names, and fresh joint/TCP values matching RoboDK. Open STATUS or DIAGNOSTICS for details. Resolve missing or stale information before motion.
See the existing setup guide for additional activation and connection help.
03 / AXIS 2.0
Pendant interface & control reference
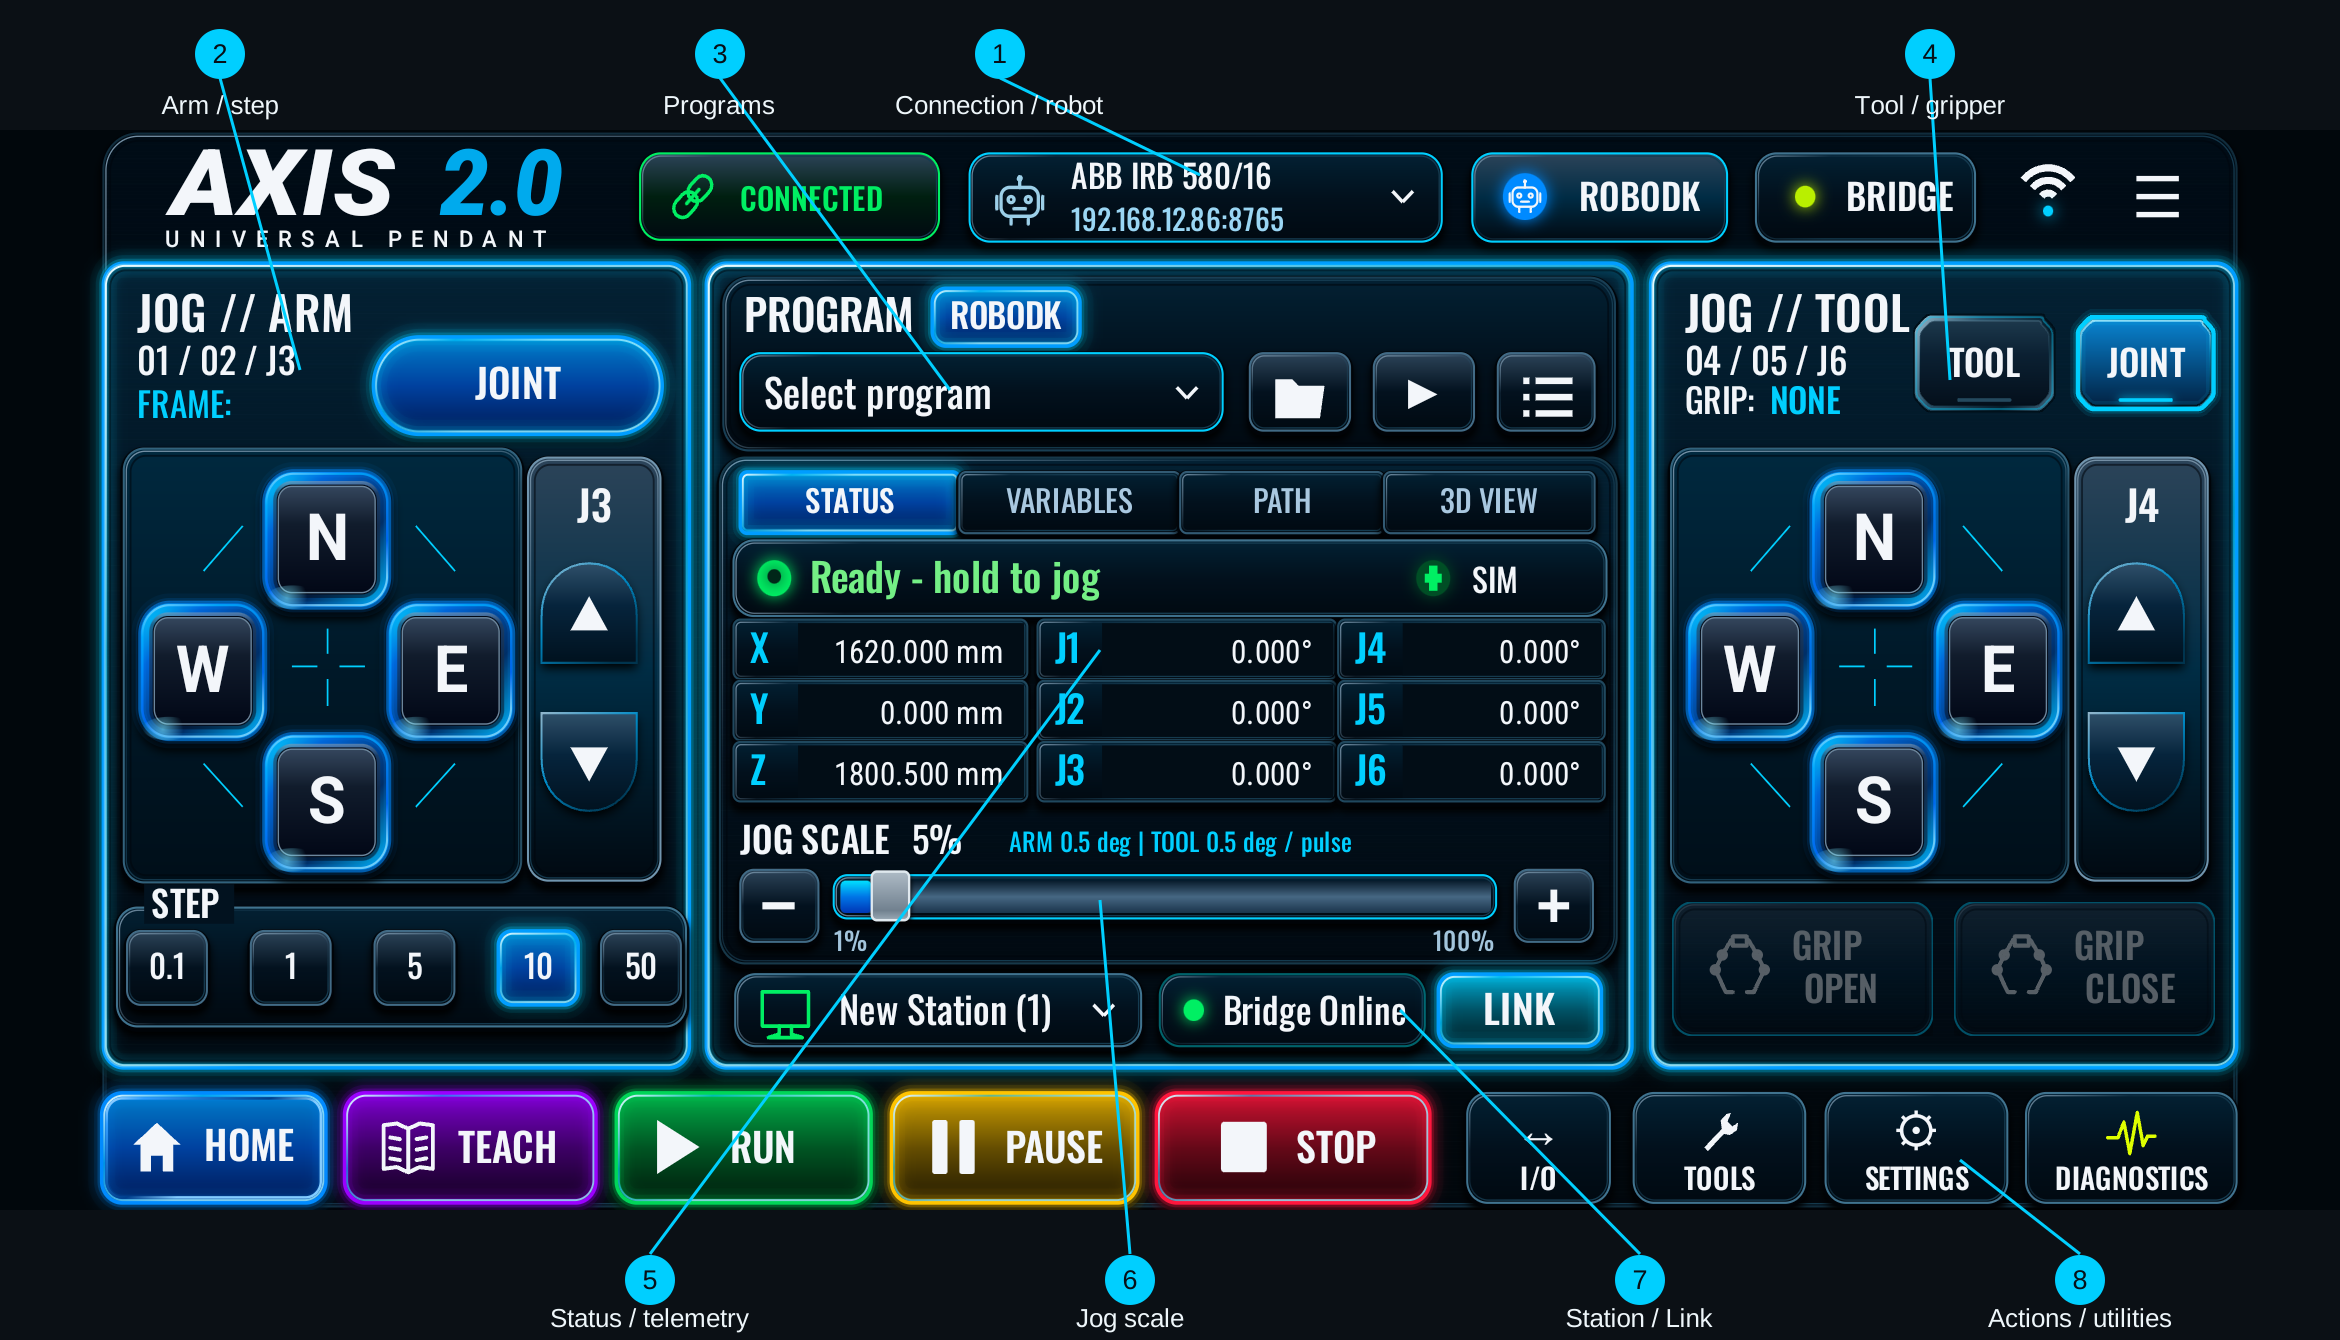
- Connection and robot selection.
- Left arm JOINT controls and STEP.
- Program selection, browser, play and manager.
- Right tool/wrist controls and gripper state.
- Status, views and live telemetry.
- JOG SCALE and per-pulse readout.
- Station identity, Bridge Online and LINK.
- Motion actions and utility panels.
Use the table as a reference while operating the pendant. On narrow screens, scroll the table horizontally. A visible button may be unavailable until the connection, selected robot and station state meet its requirements.
| Control | Purpose | How to use it | Expected result | Important notes |
|---|---|---|---|---|
| 2 · JOG ARM / JOINT | Jog arm joints J1–J3. | Hold a direction with JOINT shown. | Repeated joint displacement while held. | Arm is JOINT-only; WORLD is disabled. |
| 2 · Arm N / S | Change J2. | Hold N to decrease J2; S to increase. | Selected joint changes in degrees. | Screen compass labels do not guarantee a universal Cartesian direction. |
| 2 · Arm W / E | Change J1. | Hold W for negative; E for positive. | J1 decreases / increases. | Check the selected robot and joint limits. |
| 2 · Arm J3 arrows | Change J3. | Hold upper arrow for negative; lower for positive. | J3 decreases / increases. | Release to stop further pulses. |
| 2 · STEP | Choose the base displacement. | Tap 0.1, 1, 5, 10 or 50. | Selected value highlights. | Actual displacement per pulse is STEP × JOG SCALE / 100; units depend on mode. |
| 3 · PROGRAM dropdown | Select a native RoboDK program. | Open and choose the intended entry. | Program name becomes selected. | Selection does not execute it. |
| 3 · Folder / library | Browse available programs. | Tap folder; refresh when needed; select an entry. | Program browser opens. | Browsing does not execute a program. |
| 3 · Play triangle | Run the selected eligible program. | Check robot and station, then press play. | Native simulation program starts, or paused execution resumes. | Same run path as bottom RUN; an explicit press is required. |
| 3 · Program list / manager | Inspect and manage programs. | Tap the list icon and choose an entry. | Program Manager shows details and permitted actions. | Create/edit/rename/duplicate/delete depend on eligibility and ownership; changes affect the current station. |
| 5 · STATUS / telemetry | Read readiness, TCP XYZ and J1–J6. | Select STATUS and compare with RoboDK. | Fresh state for the active robot. | Unavailable or stale values are not readiness proof. |
| 5 · VARIABLES | Inspect connection context. | Select VARIABLES. | Station, robot, driver and session state display. | Read-only context; this is not a general variable editor. |
| 5 · PATH | Inspect selected program movement details. | Select a program, then PATH. | Available path/instruction details display. | Inspection is separate from RUN. |
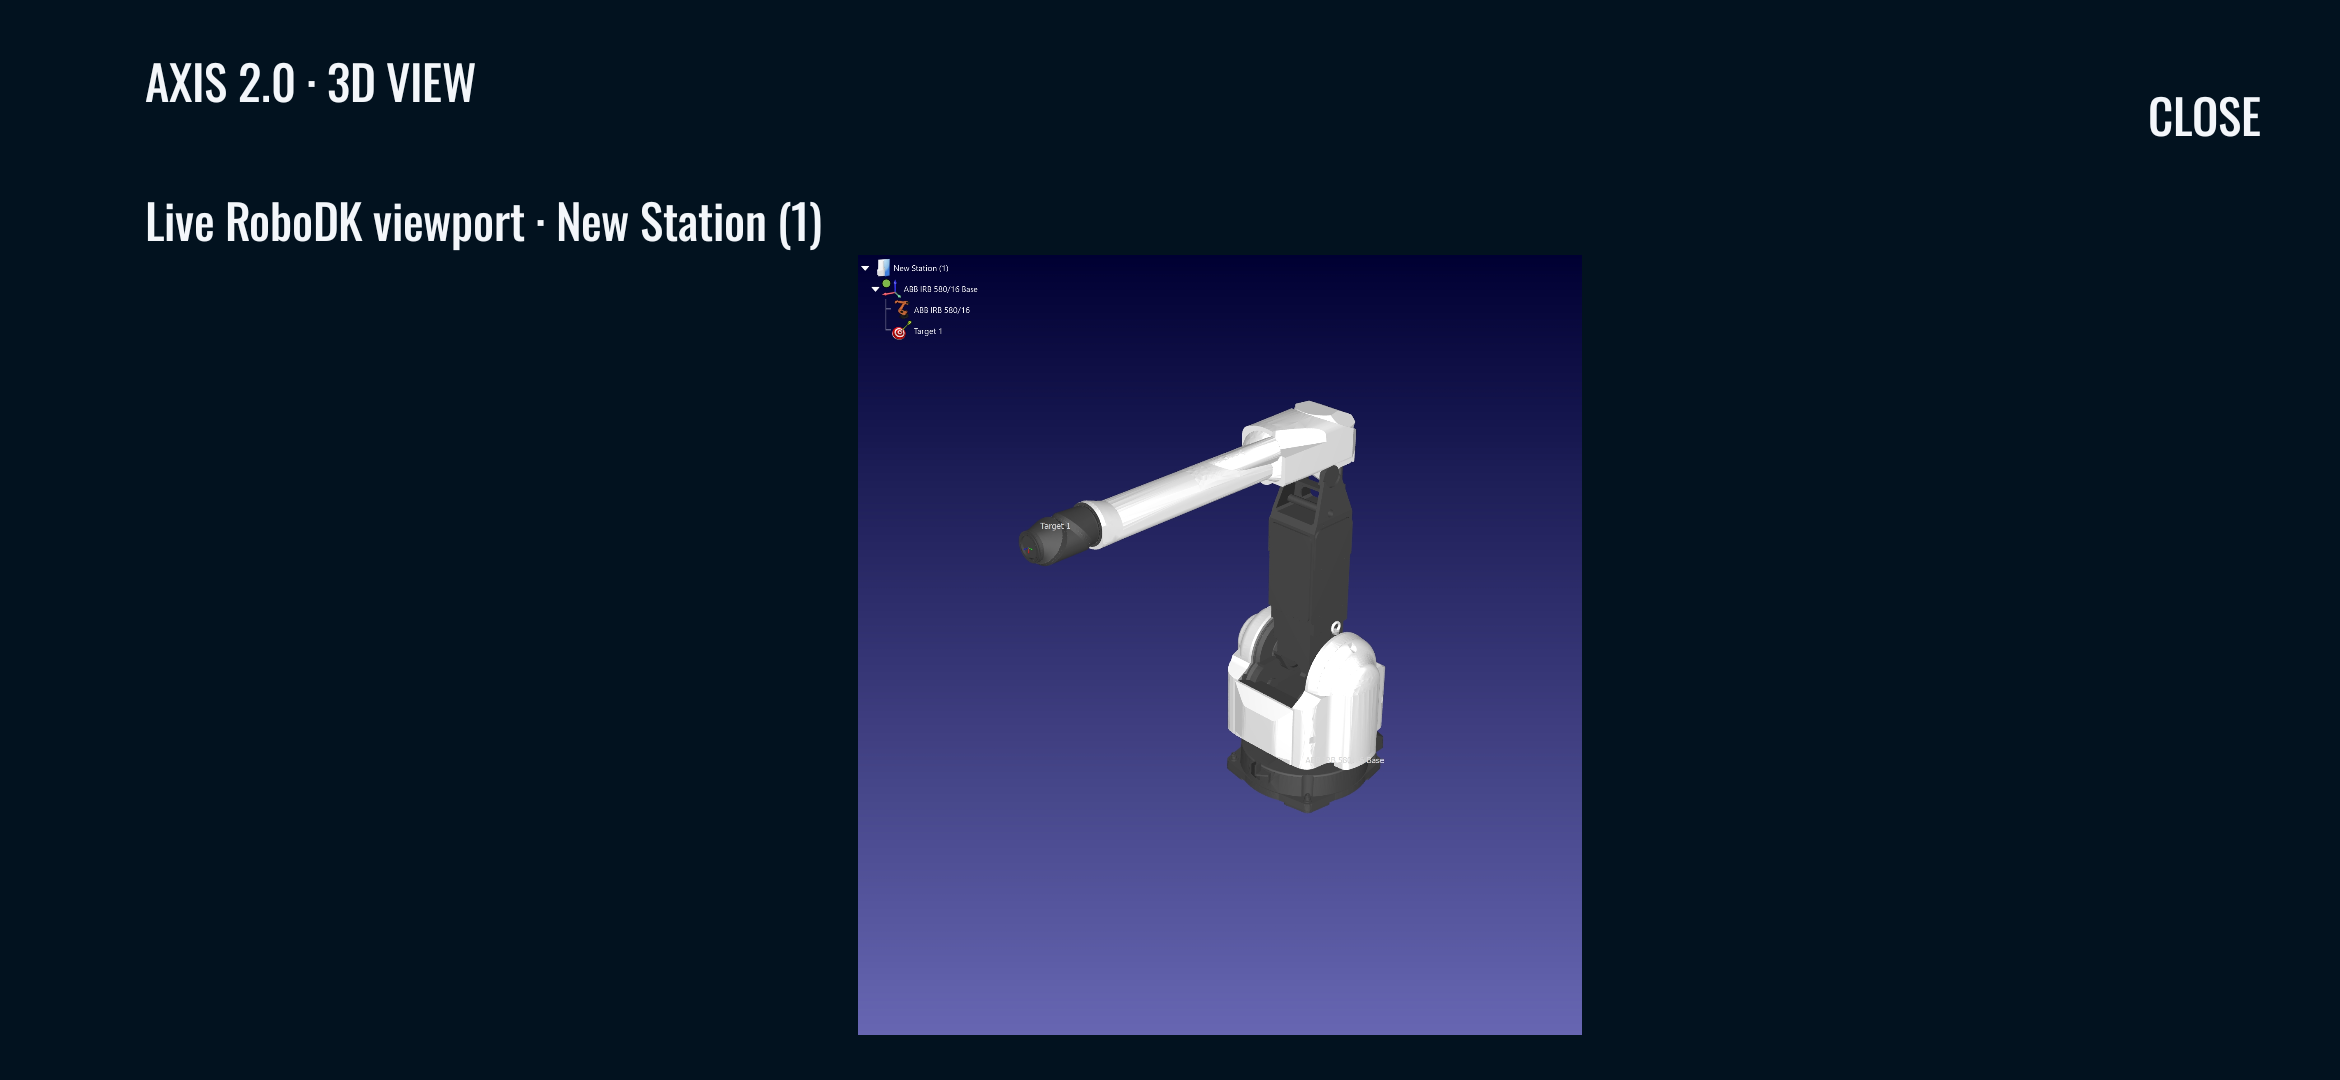
| 5 · 3D VIEW | View the live RoboDK viewport. | Tap 3D VIEW; CLOSE returns. | RoboDK image opens. | Requires a healthy simulation connection. |
| 6 · JOG SCALE / − / + / slider | Scale commanded displacement per pulse. | Set 1–100% with slider or buttons. | Displayed percentage and pulse amount change. | Not rated velocity or a safety-rated speed limit; see the jogging example. |
| 4 · JOG TOOL / TOOL / JOINT | Choose the right-hand control mode. | TOOL opens TOOL XYZ / TOOL ROTATION / JOINT J4/J5/J6; JOINT selects wrist joints. | Right-hand labels and units follow the selected mode. | Does not change the left arm from JOINT. |
| 4 · Right N / S / E / W | Jog the selected right-hand mode. | JOINT: N/S = J5 +/−, E/W = J6 +/−. TOOL XYZ: N/S = Y +/−, E/W = X +/−. | Joint or tool-relative displacement. | TOOL ROTATION uses corresponding Ry/Rx signs; reachable poses and tool configuration apply. |
| 4 · J4 / right arrows | Jog remaining right-hand axis. | JOINT: upper/lower = J4 −/+. TOOL XYZ: upper/lower = Z +/−. | J4 or tool Z changes. | TOOL ROTATION uses Rz +/−; labels change with mode. |
| 4 · GRIP OPEN | Open a compatible simulated gripper. | Wait for an eligible idle state, then tap. | Confirmed OPEN is indicated after feedback. | Supported vacuum tools instead show VACUUM OFF / release. |
| 4 · GRIP CLOSE | Close a compatible simulated gripper. | Tap only when the tool is available. | Confirmed CLOSED is indicated after feedback. | Supported vacuum tools instead show VACUUM ON / pick. |
| 4 · GRIP NONE / state | Show capability and confirmed tool state. | Read the label before using gripper actions. | NONE means no compatible detected tool; pending/unknown confirms neither endpoint. | NONE is an indicator, not a third gripper command. |
| 7 · Station information | Identify the connected station. | Read its name; tap for station information. | Station name/detail appears. | The station control does not load a different station. |
| 1 · Robot selector | Select the active robot. | Choose a supported robot in the dropdown. | Selection and telemetry update. | Recheck after each change; this is not coordinated multi-robot control. |
| 1 / 7 · CONNECTED / BRIDGE / LINK | Check and choose connectivity. | Tap BRIDGE or LINK; select/enter PC address; CONNECT. | Healthy connection and fresh station data. | CONNECTED alone does not prove a robot is ready; RESCAN refreshes discovery. |
| 1 · ROBODK | Check RoboDK connection. | Tap ROBODK. | Connection notice appears. | Does not launch RoboDK on the PC. |
| 8 · HOME | Move to configured simulation HOME. | Verify destination and idle robot, then tap. | Guarded HOME request or a blocked-state message. | Requires valid HOME configuration; it is a motion request. |
| 8 · TEACH | Record the current pose. | Wait for idle at the desired simulation pose, then tap. | Native RoboDK Target N is created and verified. | Does not automatically create or run a program. |
| 8 · RUN | Start or resume native simulation execution. | Select program; check context; press RUN. | Selected program starts, or the same paused execution resumes. | Blocked if prerequisites are not met. |
| 8 · PAUSE | Pause active native simulation execution. | Press while a started program is running. | Pause feedback; RUN resumes the same execution. | Unavailable when idle, not started, stopping, or unsupported by the connected Bridge; inspect feedback. |
| 8 · STOP | Request a software stop. | Tap STOP and verify idle/stop feedback. | Software stop is requested. | Not a safety-rated emergency stop. Resolve unconfirmed stopping before another action. |
| 8 · I/O | Inspect/change simulated station signals. | Open I/O; use ON/OFF on a signal when idle. | Simulated DI test inputs / DO outputs update. | Station parameters only; no physical driver I/O. Writes blocked during active operations. |
| 8 · TOOLS | Inspect robot, frame, tool and gripper details. | Open TOOLS and read the reported values. | Tool/frame and support information appears. | Change tool/frame in RoboDK; this panel does not provide a tool editor. |
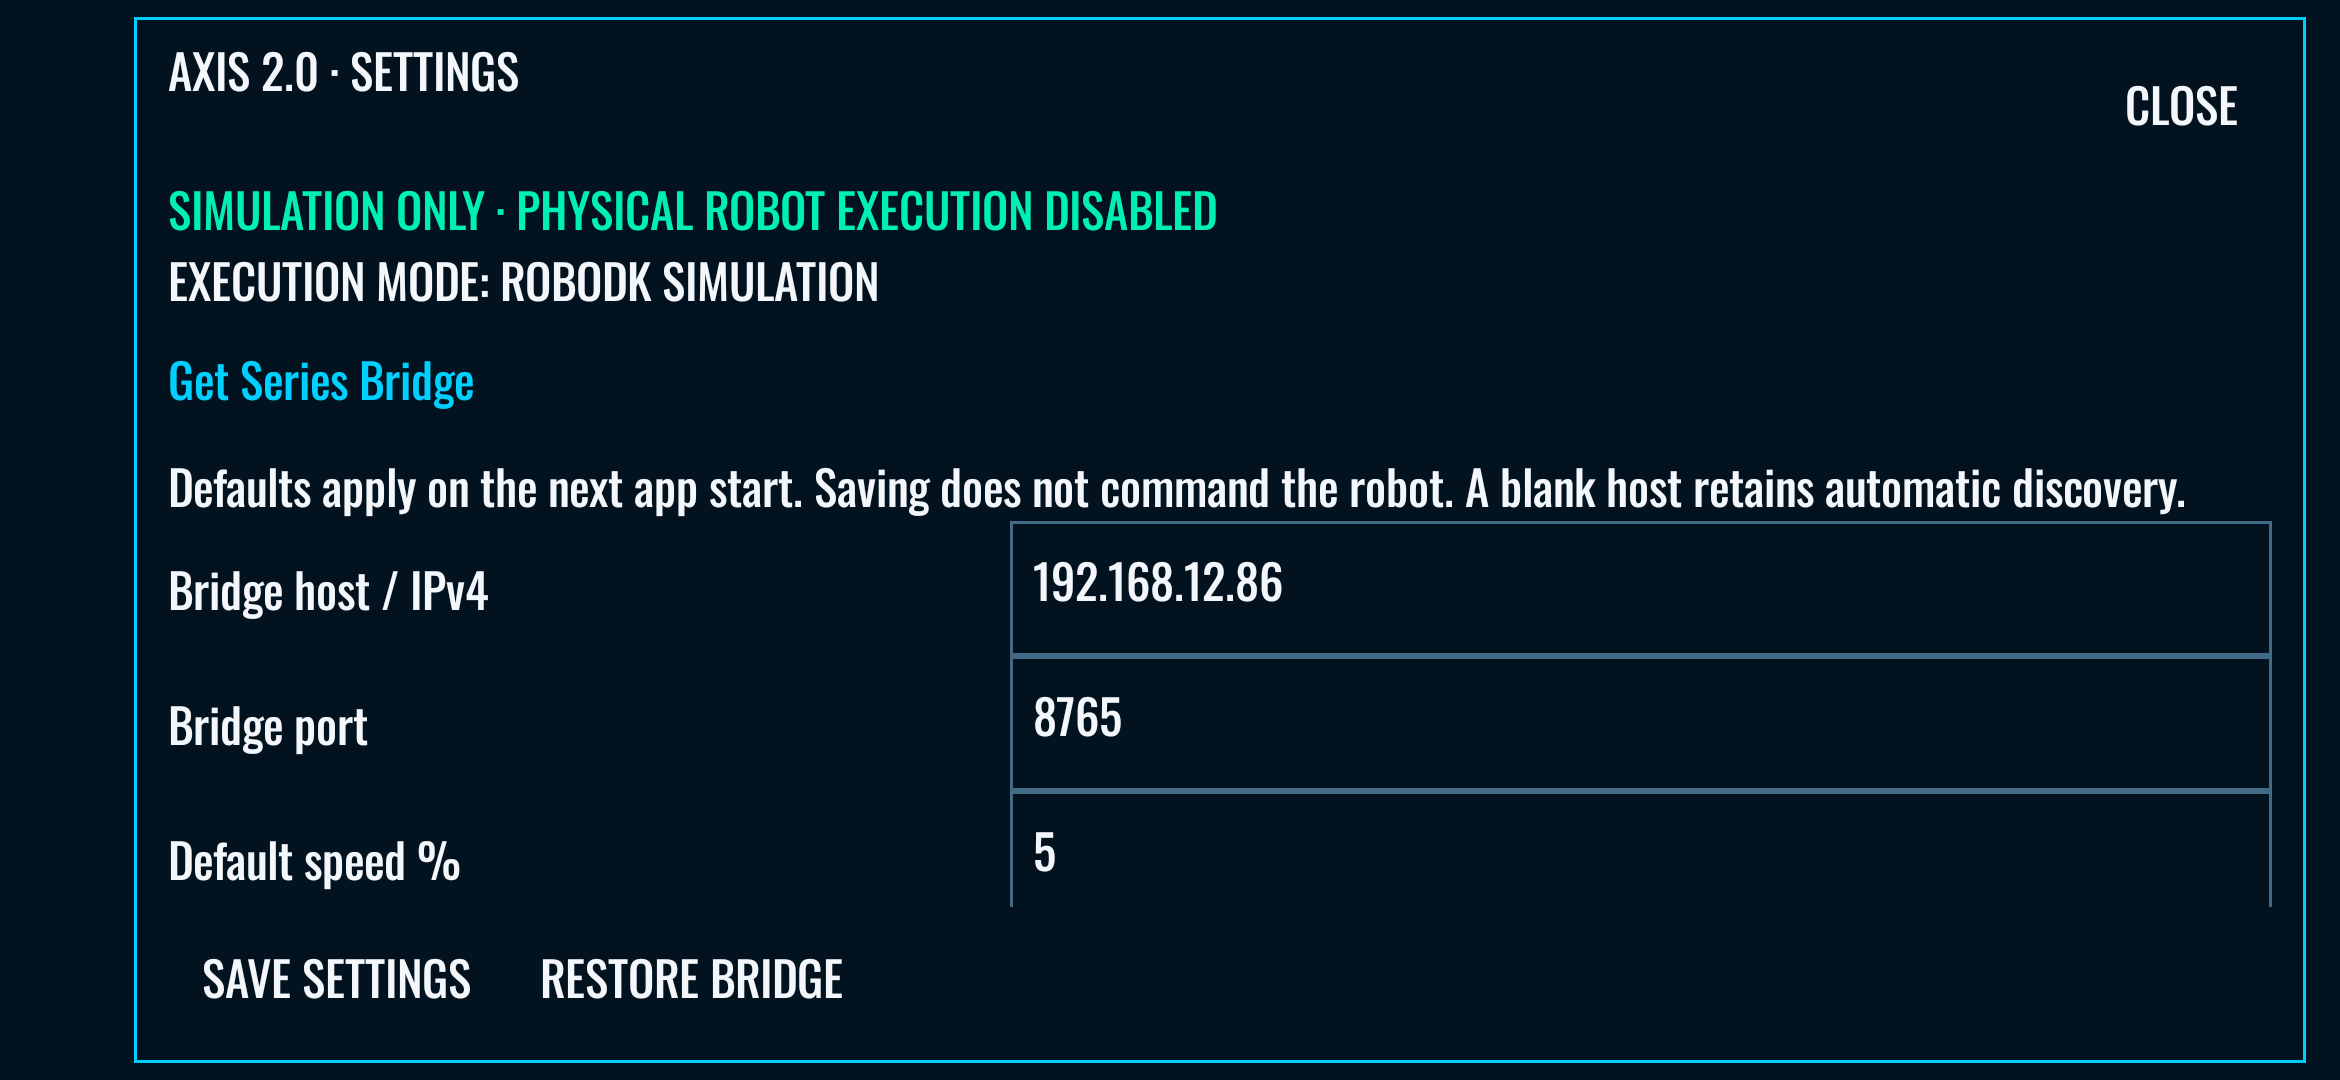
| 8 · SETTINGS / top menu | Configure saved pendant defaults and Bridge address. | Edit available fields, then SAVE SETTINGS. | Validated defaults are saved for the next app start. | Read-only while busy; WORLD is disabled. RESTORE BRIDGE requires a previous known-good address. |
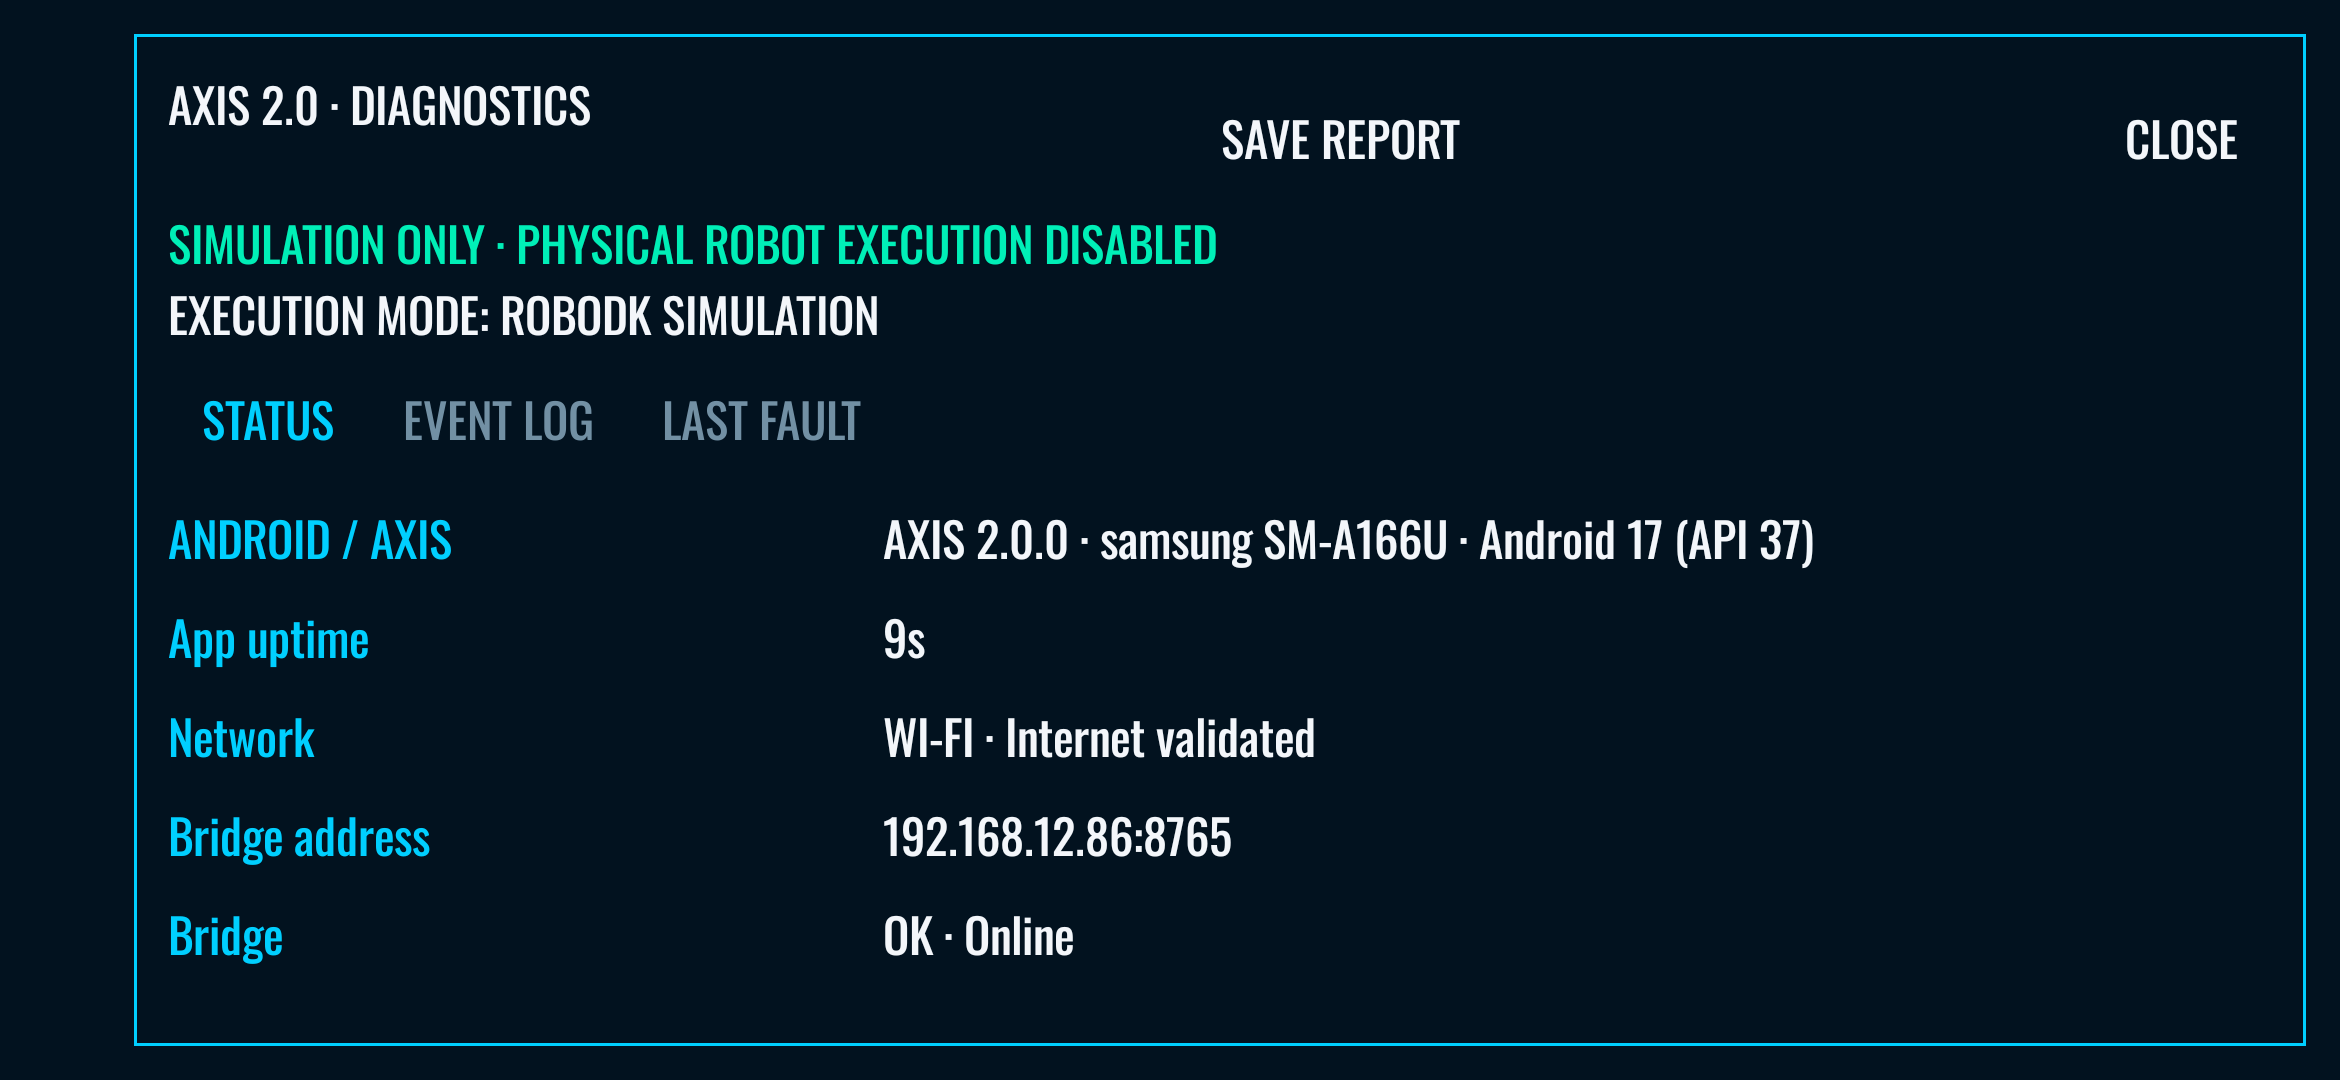
| 8 · DIAGNOSTICS | Inspect health, events and faults. | Open STATUS / EVENT LOG / LAST FAULT; SAVE REPORT exports JSON. | Health information or saved report. | Review device/network/station details before sharing. |
04 / AXIS 2.0
Jogging a robot
Use the numbered areas in the pendant image: connect in area 1, confirm telemetry in 5, choose controls in 2 or 4, then set scale in 6. This sequence commands simulation motion.
- Start RoboDK and load the intended simulation station. Disconnect physical robot drivers.
- Start Series Bridge and wait for healthy services and the correct station.
- Connect AXIS through LINK and confirm CONNECTED / Bridge Online.
- Select the intended robot and compare fresh telemetry with RoboDK.
- Choose the mode: left JOG ARM stays JOINT for J1–J3. Right JOINT controls J4–J6. Right TOOL offers TCP translation (TOOL XYZ) or TOOL ROTATION relative to the current tool.
- Set a low JOG SCALE using the slider or −/+ controls.
- Select a small STEP, such as 0.1, and check the displayed per-pulse amount and units.
- Briefly press and hold one enabled direction. Observe the selected simulated robot.
- Release to stop further commanded jogging. Verify motion/stop feedback and RoboDK before another input.
STEP and scale work together
Displacement per pulse = STEP × JOG SCALE / 100. For STEP 10 at 5%, each pulse is 0.5 degrees for joint/rotation controls or 0.5 mm for TOOL XYZ. Holding repeats pulses; network and verification timing affect their rate. Scale is not a rated robot velocity setting.
JOINT versus TOOL
JOINT changes individual joint values regardless of the screen compass orientation. TOOL XYZ translates the TCP in its current tool axes; TOOL ROTATION rotates in those axes. Tool orientation, robot configuration and reachability affect the result. If a Cartesian move is rejected or a configuration jump is reported, inspect the pose, reduce the step or use JOINT. Do not force an unavailable control.
05 / AXIS 2.0
Teaching targets
TEACH records a pose; it does not run a program. Find TEACH in area 8 of the annotated pendant image.
- Confirm the connected station, selected simulation robot and fresh telemetry.
- Jog to the desired pose, release all controls and wait for idle.
- Tap TEACH once. Wait for success or a blocking/error message.
- Inspect the resulting native Target N (for example, Target 1) in RoboDK. The implementation verifies the selected robot, joint values, pose and frame information returned with the target.
- Review the target before using it in a program. Program creation and RUN are separate deliberate actions.
HOME, jogging, program execution, gripper work and other busy states can block teaching. A missing confirmation is a reason to inspect RoboDK and Diagnostics before repeating the action.
06 / AXIS 2.0
Programs
- Load the required native program in the connected RoboDK station and select the intended robot.
- Tap the PROGRAM dropdown or folder browser; refresh and select the program. Verify its name and context.
- Use the list icon for Program Manager details. Selecting or browsing never executes the program.
- When ready in simulation, deliberately press the play triangle or bottom RUN. Check execution feedback.
- PAUSE is implemented for started native simulation execution. When pause is confirmed, RUN resumes the same execution. PAUSE is unavailable outside an eligible active run; an older or incompatible Bridge can report it unavailable. If pause/resume cannot be confirmed, the controller requests stopping.
- STOP requests a software stop. Wait for confirmed idle and inspect any fault before continuing. Reconnecting is not an instruction to replay or restart a program.
Program Manager exposes creation and supported management actions according to eligibility and ownership. Review targets and movement details in PATH before execution. This guide does not imply that every externally authored program is editable.
07 / AXIS 2.0
Gripper controls
GRIP OPEN and GRIP CLOSE act only on compatible available simulation tools associated with the selected robot. A healthy simulation connection, supported tool definition and eligible idle state are required.
- GRIP NONE: no compatible gripper is reported. The action buttons remain unavailable. NONE is not an action.
- OPEN / CLOSE: tap the intended action, then wait for feedback. Highlighting confirms a reported endpoint, not simply the last button pressed.
- Unknown / pending: a pending command, failed read or intermediate position confirms neither OPEN nor CLOSED. Check the reported tool state before another action.
- Busy / unavailable: motion or program work can temporarily block gripper actions even while a previously confirmed position is still displayed.
- Supported vacuum tools: the labels become VACUUM OFF (release) and VACUUM ON (pick). Pickup depends on a compatible tool and suitable simulated part; no universal hardware support is implied.
The pendant image shows NONE with disabled buttons. Check TOOLS for the end-effector association and reported support.
08 / AXIS 2.0
Series Bridge guide
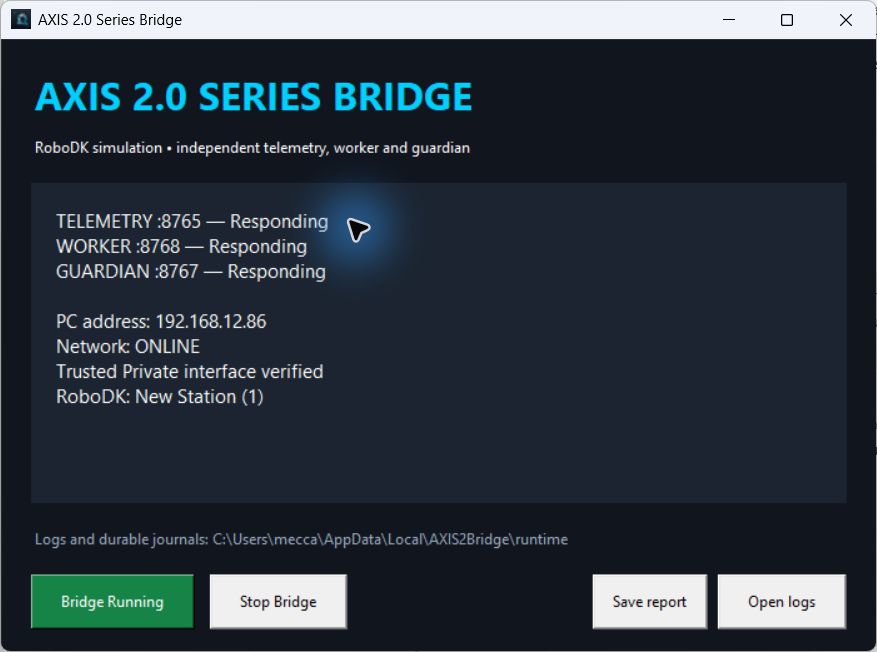
- PC address
- The local address to enter in AXIS LINK. Use the address shown on your own PC.
- TELEMETRY :8765
- The pendant connection and live state service. Wait for Responding.
- WORKER :8768
- The PC-local service handling supported RoboDK work. It stays on loopback; do not expose it to the network.
- GUARDIAN :8767
- The companion service supervising supported software operations. Responding is a software status, not safety certification.
- Discovery UDP 8766
- Helps AXIS find the Bridge. This is not the worker port in the shipped package.
- Network ONLINE
- The trusted Private network check passed. If unverified, resolve the local network configuration.
- RoboDK station
- Check this is the simulation station you intended to open.
- Bridge Running
- The Bridge services are running. Check their individual responses and AXIS telemetry too.
Keep the GUI open while using AXIS. Stop Bridge stops owned services when stopping is confirmed safe; Start Bridge starts them again. Closing the GUI shuts down its owned services. Use only one Bridge instance for these ports.
Use Save report and Open logs for support. Follow the README inside the existing verified download. The existing Series Bridge guide remains available.
09 / AXIS 2.0
Troubleshooting
AXIS cannot find Bridge
Check the current PC address, same trusted LAN, and client/guest isolation. Use LINK → RESCAN, or enter the displayed address with port 8765. A manual address still requires local reachability.
Bridge Offline
Check the GUI is open, its services respond, and the PC address has not changed. Verify the network path before trying CONNECT again. A window alone does not prove the services are healthy.
RoboDK not detected
Run RoboDK on the Bridge PC and load the intended simulation station. Inspect Bridge status and logs. If the RoboDK API is unresponsive, stop operations, restore RoboDK, then manually restart the Bridge after stopping is resolved.
Robot not appearing
Load a supported robot in the active station, refresh selection and confirm the station. An end-effector or external mechanism is not automatically an eligible arm.
Robot selected but not moving
Check fresh telemetry, simulation mode, disconnected physical drivers, idle state, selected mode, step and scale. Read the feedback/last fault. HOME needs a configured destination; Cartesian moves need a reachable pose. Do not bypass a blocked state.
Program not appearing
Confirm it exists in the loaded station and is eligible for the selected context. Refresh the dropdown/browser. Merely selecting it must not run it.
Gripper unavailable
Check a compatible simulated tool is associated with the selected robot. Inspect TOOLS and Diagnostics, wait for idle and distinguish NONE from an unconfirmed position. Do not use gripper buttons as a hardware connection test.
Connection lost
Release held controls. Inspect AXIS, Bridge, RoboDK and LAN status; do not assume motion has stopped solely because telemetry disappeared. Resolve stopping/idle, reconnect and recheck robot/station/telemetry before a fresh deliberate action. Commands must not replay on reconnect.
Windows Firewall / local network
Use a trusted Private network and follow the bundled README. If required, an administrator can use the optional Configure-Private-LAN.ps1 from the extracted package; its rules are scoped to that executable and the local subnet. Moving the executable requires updating those rules. Do not disable the firewall globally or expose Bridge ports to the public internet.
Activation or missing welcome email
Follow the activation error shown. After successful activation, check spam/junk for Welcome to AXIS 2.0 from axis@proservrobotics.com; do not repeatedly activate just to resend mail. Use the existing setup guide and contact support.
10 / AXIS 2.0
Safety
This documentation covers RoboDK simulation and supported development workflows. Keep physical robot drivers disconnected. A green status, confirmed software stop or low jog scale is not a safety certification or authorization for physical robot operation.
Verify the selected station, robot, tool, mode, reachability and fresh telemetry before commands. Release held controls before changing context. If feedback is stale, conflicting or unconfirmed, stop work and resolve the state before another deliberate action. Follow the robot and RoboDK manufacturers’ requirements for any separately supported system.
11 / AXIS 2.0
Support
Contact the existing ProServ Robotics support address: support@proservrobotics.com. Include your AXIS version, Bridge version, Windows/RoboDK versions, selected station/robot, the exact displayed message, and steps to reproduce the issue.
Use DIAGNOSTICS → SAVE REPORT in AXIS or Save report / Open logs in Series Bridge. Review reports before sharing; they may include device, network and station details. Do not send passwords or API keys.
Setup guide · Series Bridge guide · Capabilities · Privacy · Data deletion